This post contains affiliate links, meaning I may earn a commission if you click through and make a purchase. As an Amazon associate, I earn from qualifying purchases. This comes at no additional cost to you. I only recommend products or services that I believe will provide value to my readers based on personal experience or thorough research.
Storyboarding is the foundation of animation. Before a single frame is animated, the storyboard maps out every scene, camera move, and emotional beat. It’s where ideas stop being abstract and start becoming a visual plan that the entire team can follow.
In animation, storyboards aren’t optional—they’re essential. If something doesn’t work here, it won’t magically work later. Storyboarding lets animators test pacing, composition, and storytelling early, saving time, money, and creative frustration down the line.
Why Storyboarding Matters in Animation
Storyboarding for animation began in the 1930s at Disney, and while the tools have evolved, the purpose hasn’t changed. A storyboard breaks the story into clear visual beats, ensuring continuity, clarity, and strong visual storytelling.
For animators, storyboards act as a bridge between script and motion. They clarify camera angles, character staging, and shot transitions long before animation begins. This keeps production focused and prevents costly rework later.
Core Storyboarding Techniques for Animators
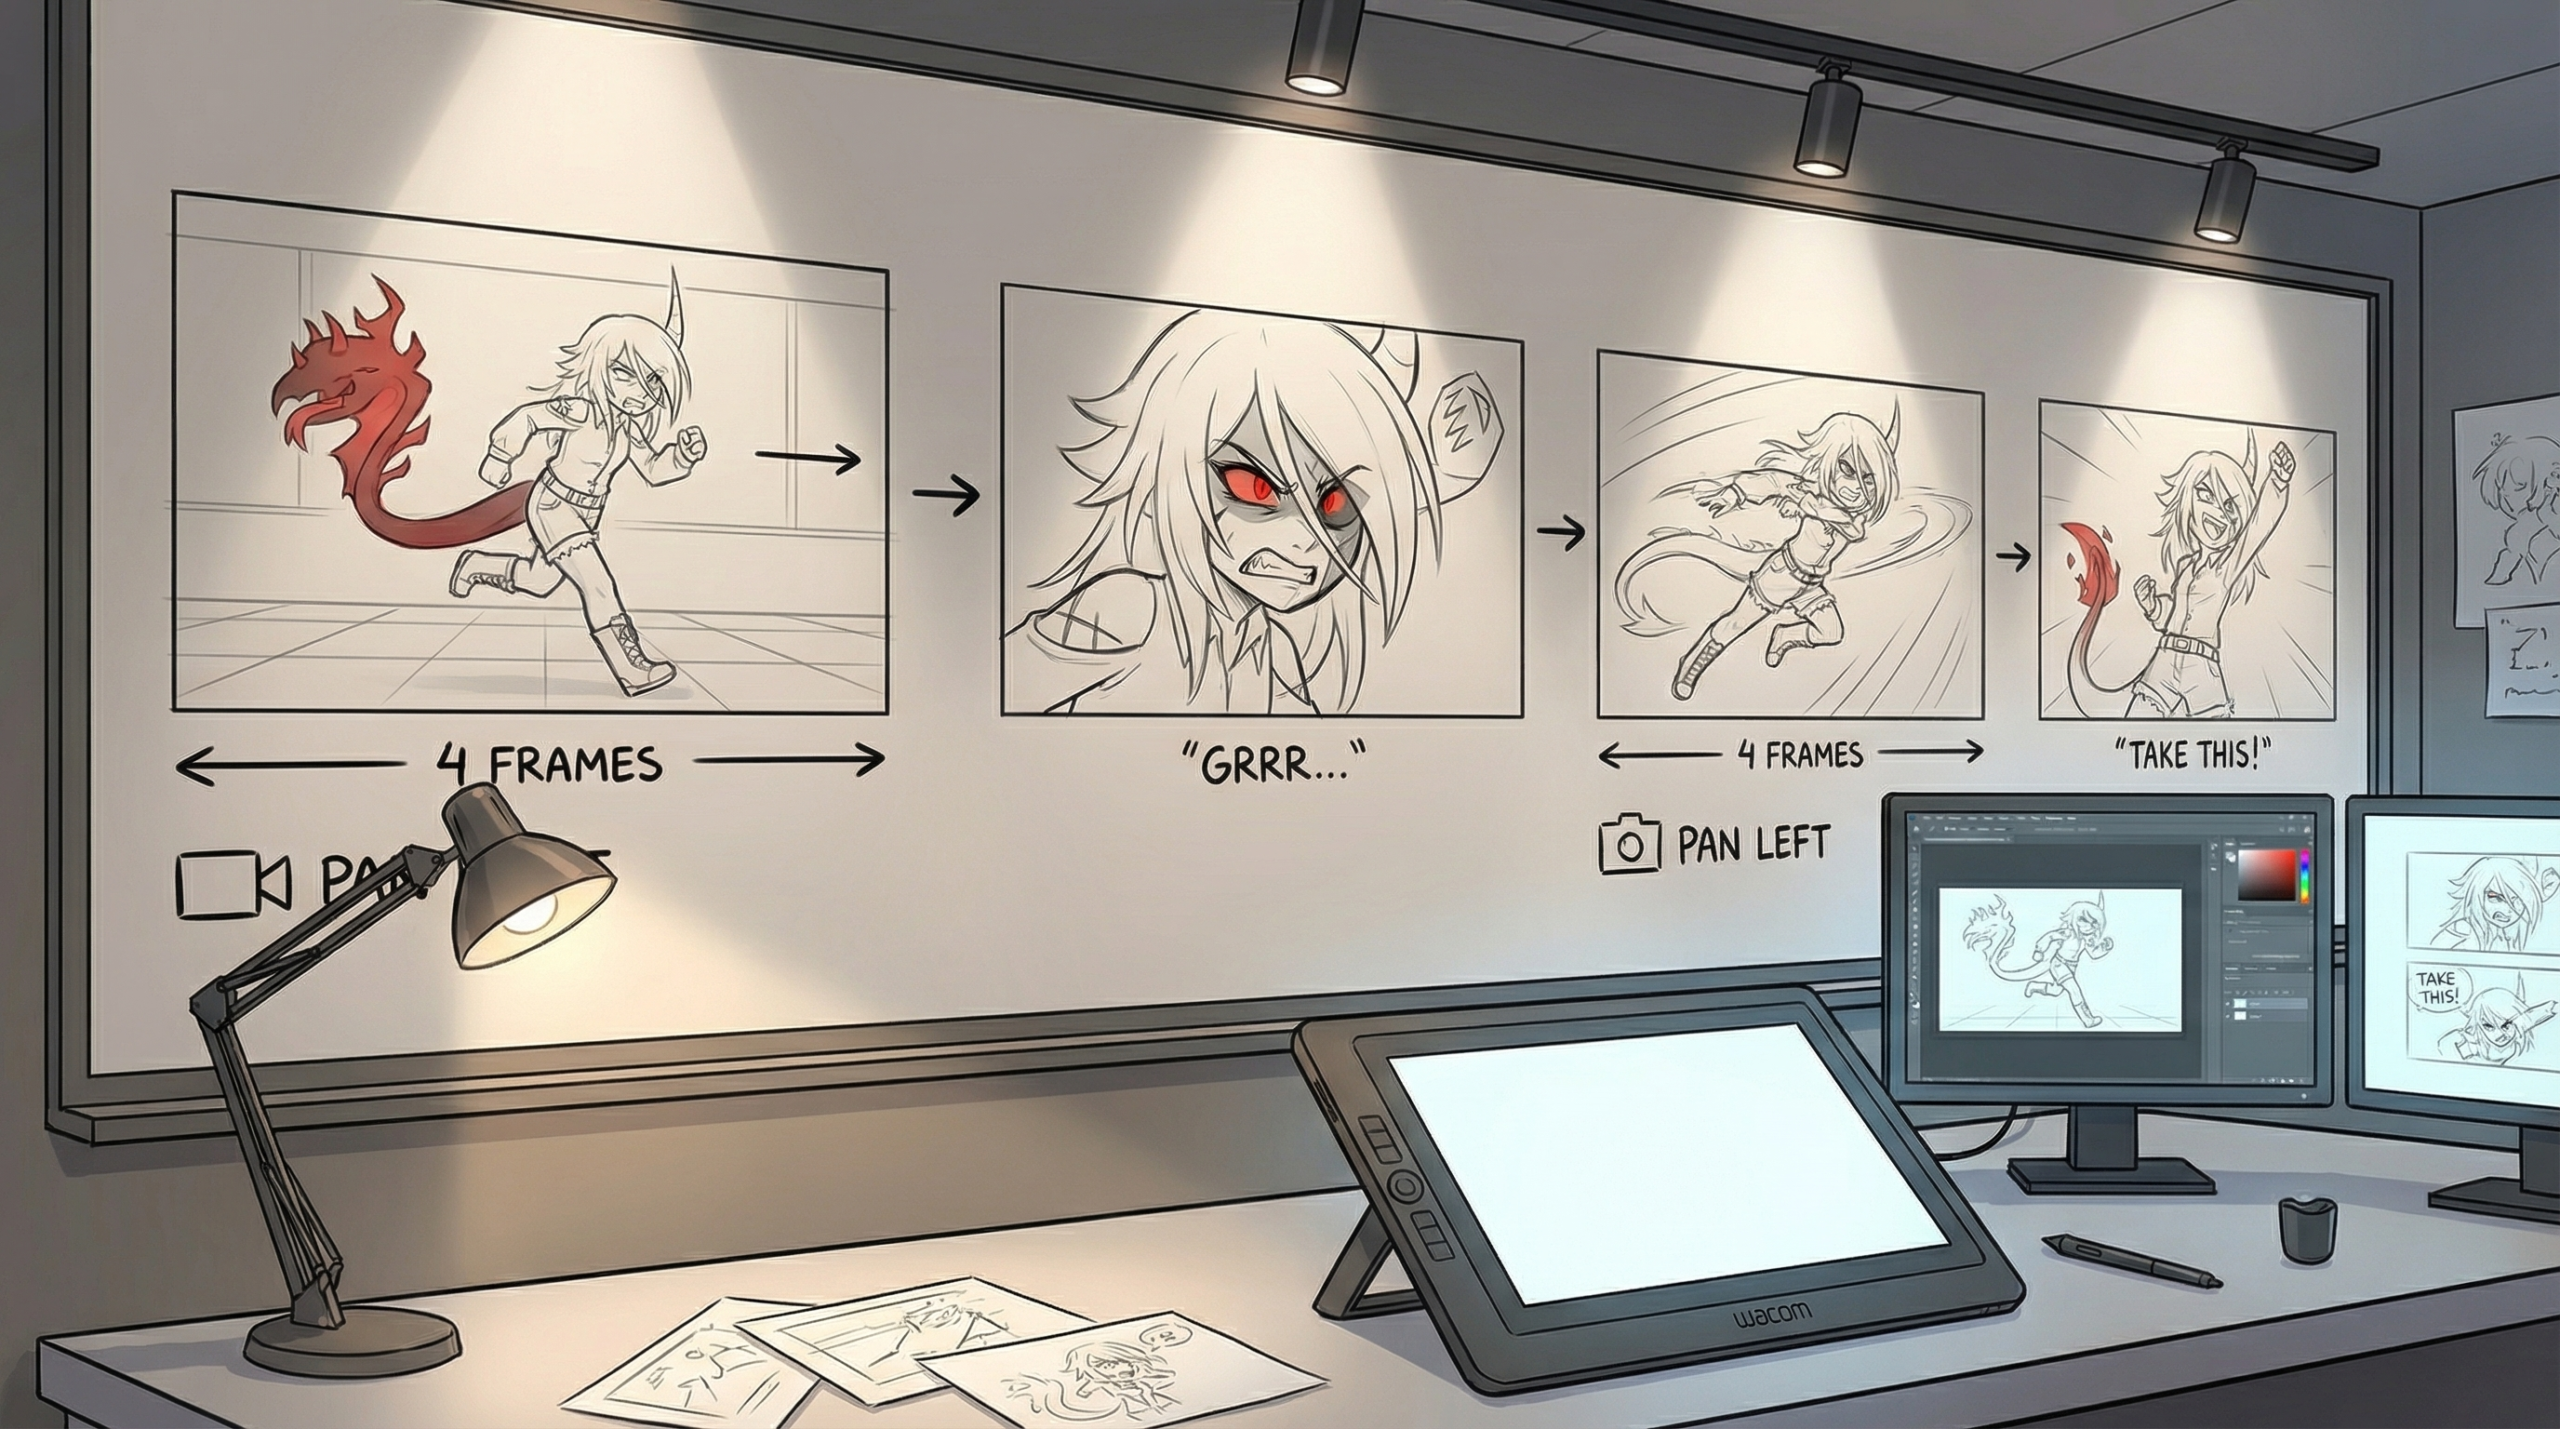
Strong storyboards rely on clear framing and readable poses, not polished drawings. Each panel should communicate action, emotion, and intent at a glance. Think of every frame as a frozen moment that tells part of the story.
Pacing is just as important as composition. Varying shot sizes, holding on key moments, and controlling visual rhythm helps guide how the audience experiences the animation. Smooth continuity between panels ensures the story flows naturally from shot to shot.
Advanced Animation Storyboarding Methods
Once the basics are solid, animators can push storyboards further with dynamic camera movement, perspective shifts, and layered depth. Foreground, midground, and background elements help scenes feel dimensional and cinematic.
Including notes for sound, dialogue, and timing adds another layer of clarity. Indicating music cues, pauses, or key lines helps everyone understand how the scene will feel once animated, not just how it looks.
Tools and Workflow for Storyboarding
Animators can storyboard traditionally with pencil and paper or digitally using tools like Toon Boom Storyboard Pro. Traditional methods build strong fundamentals, while digital tools allow fast revisions, easy sharing, and better organization.
The best workflow is the one that keeps ideas clear and flexible. Storyboards should stay loose and editable, focusing on storytelling rather than perfect artwork. Clarity always beats detail at this stage.
Common Mistakes to Avoid
One of the biggest mistakes is over-detailing panels. Storyboards aren’t finished animation—they’re a communication tool. Overloading frames with unnecessary detail can slow production and obscure the story.
Another pitfall is ignoring feedback. Storyboards are meant to be reviewed, adjusted, and improved. Early collaboration strengthens the final animation and helps catch weak moments before production begins.
FAQs
Q: What is storyboarding in animation?
A: Storyboarding is the process of planning an animation visually by breaking the story into sequential panels that show shots, action, and timing.
Q: Why is storyboarding important for animators?
A: It helps animators plan pacing, composition, and continuity while identifying problems early before animation begins.
Q: Do storyboards need detailed drawings?
A: No. Clear, readable sketches that communicate action and intent are more important than polished artwork.
Q: What tools do animators use for storyboarding?
A: Animators use pencil and paper or digital tools like Toon Boom Storyboard Pro, depending on workflow and project needs.
Q: Can storyboards include sound and dialogue notes?
A: Yes. Adding notes for sound, dialogue, and timing improves clarity and helps guide animation and editing.
Hi Skylar,
This is a very well written article on storyboarding techniques for animators. Since I was a young child, when I first found out how cartoons were made, I have been amazed at what detail and hard work goes into making my favorite cartoons. From Fred Flintstones’ taking the family for a ride in the family car, courtesy of Fred’s two feet to George Jetson arriving at work in his flying car and pushing a button for the car to collapse and change into a briefcase and everything in between is a marvel of the imagination of the creators to the animators creating the product of showing the story to the audience. I have always thought that the amount or work put into making a cartoon far exceeded that of making a tv situation comedy. So, here are my questions. What is the primary purpose of a storyboard in animation production, and how does it streamline the animation process? Second question, how can dynamic camera angles enhance the mood or intensity of an animation? And finally, how do you balance clarity with creativity in a storyboard, ensuring it serves both artistic and technical needs?
Thank you,
Mark
Hi Mark,
Wow, I love how you captured the magic of animation—it’s like stepping into a creative time machine! 🚗💨 Fred Flintstone to George Jetson really shows how much imagination fuels this industry. You’re totally right; the amount of work that goes into cartoons is mind-blowing, and storyboards are a huge part of what makes it all come together. Let’s dive into your awesome questions!
What’s the Primary Purpose of a Storyboard in Animation Production?
The storyboard is like the blueprint for the animation. Its main purpose is to visually map out the narrative, shot by shot, so the entire team knows how the story will unfold before production even begins. This helps in a few ways:
Visualizing the Story: It allows creators to see how scenes will flow, making it easier to spot pacing issues or clunky transitions early.
Saving Time and Money: It’s way cheaper to tweak a drawing than to reanimate a whole scene. Storyboards are the ultimate planning tool.
Team Communication: Everyone from animators to editors to voice actors can understand the creative vision through the storyboard. It’s like the glue holding the production together!
How Do Dynamic Camera Angles Enhance Mood or Intensity?
Dynamic camera angles are like spices in a dish—they can completely change the flavor of a scene. Here’s how they work their magic:
Mood Enhancement: Low angles make characters feel larger-than-life and powerful, while high angles can make them feel small or vulnerable. Tilted angles (Dutch angles) can create tension or unease, perfect for action or dramatic scenes.
Intensity Boost: Quick zooms, sweeping pans, or close-ups can amplify action or emotion. Think of a chase scene—the camera’s movement adds to the adrenaline rush!
Guiding the Viewer: Dynamic angles direct the audience’s attention to what’s important, like a character’s face in an emotional moment or a dramatic setting in a reveal.
Balancing Clarity with Creativity in Storyboarding
This is a big one because storyboards need to inspire and communicate effectively. Here’s how I approach it:
Start with Clarity: Make sure the composition, movement, and key beats are easy to read. A storyboard is a guide for the entire team, so it has to convey the essentials without confusion.
Layer in Creativity: Once the basics are solid, you can experiment with interesting framing, lighting ideas, or unique transitions to elevate the artistry.
Test the Flow: Play through the panels like a flipbook. If it feels smooth and the story is clear, you’ve nailed it. If anything feels jarring or unclear, simplify it.
Iterate Often: Storyboarding is all about revisions. Sometimes creativity and clarity clash, but tweaking things a little at a time usually brings them into harmony.
I hope this answers your questions, Mark! Honestly, storyboards are where the magic really starts to feel real, and getting them right sets the stage for everything that follows. Thanks for such thoughtful questions—you really made me think about what makes this process so special!
Best,
Skylar 😊